Do you often get attracted towards all those stylishly written words on a wedding card? Calligraphy is generally known as the art of writing and it can allow you to write beautifully on paper, no matter how good or bad your handwriting is. Learning calligraphy is a great thing because you can over a period of time not just improve your handwriting, but also learn the art of writing. Most people who want to learn calligraphy do find the websites where they get information about calligraphy, but they are not sure how to get started and how they can learn modern calligraphy step-by-step to ensure that they are on the right track on how to choose the right nibs and paper quality, how to set up workspace and best practices of calligraphy.
How to Buy Essential Supplies?
Calligraphy like any other art requires patience and practice, but it also requires certain essential supplies and quality tools that can help you to achieve your goals. The supplies and tools are not very expensive so you can always find good quality supplies at affordable rates. NibsNibs play an important role in modern calligraphy and therefore you need to purchase flexible and pointed nibs that can make your writing seem beautiful. While there are many different types of nibs available in the market, as a beginner you must choose Nikko G, a reliable and sturdy nib which is an excellent choice for beginners. Nib HolderNibs will require nib holder that can hold the nib straight while you are writing. Look out for the nib holder that has a general holder, so that you can wedge the nib between the metal rings and make sure its holds tight. InkUsing the right ink can enhance or ruin your calligraphy experience so make sure you choose wisely. Some inks need to be mixed with water while some come pre-mixed and you can use it right from the bottle. Dark India Ink and Sumi Ink are highly recommended for beginners. Paper
The quality of paper you use is equally important. Normal printer paper might bleed when you start writing and therefore is not the right choice for calligraphy training. Layout paper like Hahnemuhle Layout Pad that does not bleed and is not too textured.
Getting Started
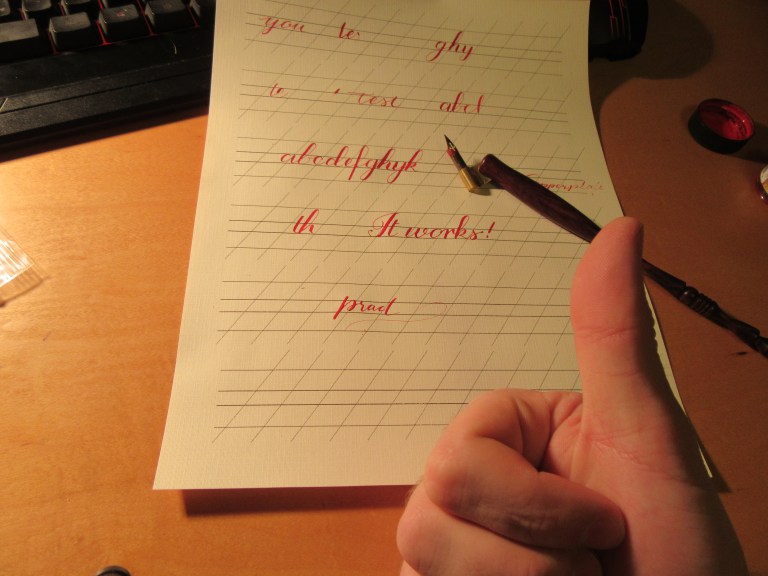
When you have all the essential supplies you can get started with setting up the workspace. To start with, you must clean the nib as all nibs have a chemical coating applied to them during the manufacturing process to prevent from rusting. This chemical layer can cause writing problems and make your nib act weird. Before you begin writing you may dip the nib in alcohol and use soap to remove the chemical residue.
While setting up the workspace, make sure there is ample space available as you will move your elbow while writing it. Place the ink bottle on the right hand side if you’re right-handed and on the left side if you’re left-handed to avoid ink drip on the paper. You may use guide sheet paper under the layout paper before you begin.
To start, you must dip the nib in the ink about halfway up the nib. Write slowly and be patient. Hold your pen at approximately 45 degree angle from the paper. Apply pressure on downstrokes and avoid applying pressure on the upstrokes.
Practice basic letter shapes to begin with and see how they connect together. You’ll also learn that few letters group into similar looking shapes.
If you’re bored of just writing letters you may want to write your name. However, it is recommended that you only start writing whole sentences when you’re comfortable writing letters and until it seeps into your muscle memory.
To conclude, calligraphy like any other art takes time to learn and therefore you must be patient and willing to learn. You must practice it regularly to ensure you learn quickly and the movement of your pen seeps into your muscle memory allowing you to know how the letters form and how they take shape even when you’re not consciously writing it.
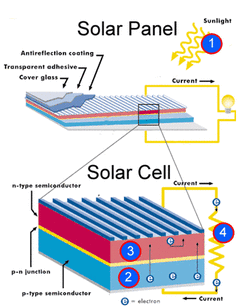 Are you thinking of installing solar panels at home? If yes, it would be a good idea to understand how they work before making a purchase. Keep reading to find out more. Light energy is produced by the Sun and this called photons. Through solar radiation, the panels on solar systems would capture photons and convert the energy actively into electricity. The solar panels will work through a process known as photovoltaic, where the radiation energy is absorbed to generate voltaic (electricity). Semi-conductor cells, generally the silicon type, absorb radiation energy that is transformed from light energy into electric current. Once the radiation from the sun connects with a silicon atom, electrons will be released as the absorption of photon light energy occurs. An electric current will be created when the electrons release. This electric current will then go to an inverter that converts it from direct current (DC) to alternating current (AC). After that, the system is connected to the main electricity or power grid. You should know that there are two kinds of solar panels; one that generates electricity and the other generates heat. It is also important to understand more about the different systems when you want to know how solar panels work. The solar panels which generate electricity are often referred to as photovoltaic cell system. These typically use silicon as the semi-conductor material. Direct current or DC electricity can be produced when the silicon and sunlight interacts. The panels will work only during the day when the sun light is available. Depending on the solar system size, it could produce electricity that can power an entire house or just the general appliances. For pricing information, check out this resource that describes solar panel cost per watt. The other solar panels will use the thermal energy of the sun to heat oil or water through thermal collectors. These panels are usually made to use with plastic coils and piping. The sun would heat the liquid that is running through the coils in order to pass on the energy. Generally these panels are used to provide heat to Jacuzzi, swimming pools, hot tubs and spas. The two types of solar panel systems use glass frame to retain the collection cells and they also need direct sunlight to work at their full capacity. Even though you can place solar panels in any location to harness the sun's energy, the systems will not function effectively in areas with cloudy weather throughout the year. Hopefully, the information above will help you to understand more about how solar panels work. When you decide to use solar energy at home, it will also be a good idea to get a backup generator system. Another great way to cut down on your electricity use is to buy window treatments that save energy. This will come in handy when rain falls for extended period or if the batteries are not working effectively to store the required amount of electricity.
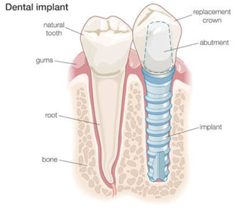 The implant surgeries are mostly performed by specialist handling the dental surgeries. One single dental implant surgery requires an entire team of specialists like oral surgeon, periodonist and other specialized individuals with knowledge in implantation surgeries. The dentists are specialized in abutment, bridges; implantation of crowns and dentures. The dental implants is usually expensive. These are surgeries which require team of specialized professionals to ensure immaculate implant. The average cost of dental implants is usually between $1,200 and $3,000. Though this is the general cost of an ordinary implant but the budget might rise if the implant involves sinus posterior mandible and sinus elevation. If the patient requires a narrow or wide diameter implant the budget can rise between $15,000 to $29000. This high budget ensures immaculate implant of lower or upper jaw. It has been a common belief that dental implant is expensive than alternate methods. In reality the dental implants are much more effective and reasonable than other form of replacement. The other form of repair requires extensive procedures, replacement and repair in order to preserve the facial structure and further loss of teeth. It is essential to know that dental insurance does not cover the charges of tooth implants .The insurance organizations have categorized under cosmetic surgery and thus excluded health insurance. Thus you need to have extra savings to treat your teeth. If you are planning for a combo treatment that includes treating of defected bone and bridge replacement then the total expenditure might increase by $6,000 within the next 12 to 15 years. However a simple dental implant along with a supported crown will not cost you more than $2400. If a patient is recommended for bone grafting, tissue grafting, sinus lift, extraction the budget may rise as high as $4,000 to $10,000. If a patient is planning a for more than five dental implants and a full or partial dental bridge at one then he or she will have to pay something between $3500 and $30000 and even more. The entire budget will depend on the number of implants, material and the bridge size the individual will requires. An entire set of teeth implant, that includes, lower and upper and a denture will cost you around $7,000 and $9,000. According to the report of the CostHelper, a patient has to pay between $3,000 and $27,000 to implant one denture plate. If the patient is prescribed full implant then he or she needs to invest around $35,000. While these prices might sound a bit steep, the cost of dental implants can often be reduced by your insurance policy, just like for other health-related procedures such as facial mole removal. The implant surgery involves numerous stages. To begin with it requires abutment, crown and denture. The mentioned treatment are in different stages. The replacement of abutment or replacing the teeth and jaw surgery might require a big budget. If you are planning to place an abutment and the dental crown in a single implant then the cost will be between $500 an $3,000. The implant will cost you around $2000 to $12000. The Dental School Clinics are offering discounted rates against the service provided by the faculty or students. The price listed by the Cost Helper reflects the difference between the normal range and the reduced amount. The school charges a mere amount of $60 for extraction and $75 for bone grafting. If you are planning for a single implant then a budget of $1200 will be enough. The crown will cost you around $ 600.
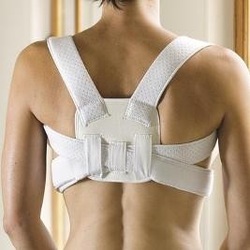 If you feel like you lack energy and the upper part of your back feels tense, the solution to your situation doesn't have to come in a pill or a dramatic change in your lifestyle. In fact, a straight posture might be all you need to feel more energized and tension-free. Muscle tension around your upper back can make you feel more tired than you need to be. You can relieve this tension by using a posture corrective brace. What is a posture corrective brace? A posture corrective brace is usually made of cloth, and it is designed to align the muscles of your back in such a way as to improve your posture. Many people have bad postures because of muscle tension or bad muscle alignment at certain parts of the upper and mid-back. Posture corrective braces hold muscles in a certain configuration so you can straighten your posture. These specialty back braces usually have light plastic pieces as well. They work gradually to help you make a better impression on people by straightening up your posture. They also help relieve muscle stress and tension at certain parts of your back. Use a posture corrective brace to get a new lease on life If you feel stressed, tired, or unmotivated, some of this might be due to your posture. Wearing a posture brace can help relieve muscle tension. With this handy, easy to conceal device, you won't need a trip to the chiropractor to feel better. You only need to wear them under your everyday work clothes and no one will notice. Well, not exactly, people will notice something different about you as your posture improves but they can't be fully sure what the change is. Just like the cost of lingual braces, investing in a posture brace can change the impression you make on people thanks to an improved posture. Feel more energized instead of feeling 'heavy.' This heavy feeling, caused by muscles when you slouch, tends to decrease your energy level. While it takes getting used to for the first few days, you will soon get used to your posture corrective brace. You will also appreciate the energy you feel. If you feel heavy or unmotivated, this simple device might be all you need to get a new lease on life. It is an over-the-counter device so getting access to it is very easy. If you want a non-chemical and relatively convenient way to add a little spring to your step and a bit more energy to your day, look into getting a posture corrective brace today.
 Of all the birthday celebrations for children, the sixteenth one is definitely the most important. The teenage years are often the most difficult times, as they might feel insecure and awkward about the changes to adulthood. For this reason, it’s always a good idea to arrange a special and unforgettable event for a sweet 16 party. The first thing to keep in mind is that this party should have a theme that is more grown-up. So, you need to avoid childish activities or games. Special attention should also be placed on the guest list to ensure that the party is mainly filled with the teenager’s friends. The following will highlight some ideas that you can consider if you want to plan an amazing sweet sixteen celebration. Amazing Ideas Themed parties are very popular for sweet 16 birthdays today. Choose a happening theme that can appeal to the teenager's crowd. Some of the popular themes are Hollywood and movies, rock party, rhythm & blues or rap music, fashion or slumber party for girls and sports for boys. After deciding on the theme, you can send the guests personalized invites. There are many ways for you to do this easily these days. You could use a software application; write invites on fancy paper or use embossed paper with the logo to represent the teenager's favorite movie characters or sports team. Just use your creativity and imagination to keep the invites interesting and unique. Now, if you want to include games in the birthday celebration you should avoid activities like whacking the piñata or pinning the tail on donkey. It is highly likely that your teen will be more interested in dancing and socializing with friends. But, some good game ideas for sweet 16 parties include dancing contest or playing charades. This will encourage the partiers to act out things for prizes such as gift certificates, gift baskets, DVDs or CDs. Another fun idea for a sweet 16 party is an outing at the local movie theater. You should plan this so that the guest can watch the latest movie. For this, you might have to ask another parent or family member to drive some of the guests to the movie event. It will be a lot more fun if everyone get to sit together in a row of seats. You should also get some great tasting foods to make this sweet 16 party special. Arrange a party menu with all your teenager's favorites. Teenagers love to eat pizza, fries, burgers, sandwiches, ice cream and cake. Ensure that you have a wide assortment of beverages such as energy drinks, sodas and milkshakes. Also make sure that if you have diabetics in attendance, that you take their dietary needs into consideration and have no sugar desserts available for them. Keep these ideas in mind to plan an amazing sweet 16 birthday party that is memorable and enjoyable. Try to plan everything in advance as this will help you to have a successful and stress-free event.
 Do you want to make your house gorgeous with the beauty of vinyl siding? Vinyl siding is one of the best decorative and attractive material available for the homeowners to make their home attractive. Over the period its demand is on hike at present millions of American homeowners have decided it as the exact material for them. Vinyl siding is cost effective if you are willing to do the work by alone. It is available in the market with proper instructions to build, so it will be easier and cost effective task for you to work by yourself. Vinyl siding generally includes 12-ft length of siding, J-channel, door/window trim channel, utility channel, metal starter strips and corner moldings along with vented and unvented soffits and fascia covers. The siding should be installed over the flat surfaces so before installing you must line up the walls with rigid-foam board in order to provide flat nailing surface. Most important thing in vinyl is that it can be used as the best alternative to house paint and also give much relieve in dressing up the problems regarding walls. In spite of its look as conventional siding from a distance the illusion falters over windows, doors and wall. There are various styles and colors of vinyl siding are available you can choose any one as par your choice and requirement, much like the many styles, prices and qualities of granite countertops there are out there. Ways to deal with vinyl siding: First of all to deal with vinyl siding you should have special unlocking tool known as zip tool. Cutting vinyl siding – Vinyl siding is designed in such a way such that it can loosely hang and thus allows to expand and contact with the change of temperature. In order to prevent the thin panel from buckling go through the nailing and fitting rule: 1. Leave ¼ inch gap across all the ends. 2. Then lock the panel into one below and then snug carefully before nailing followed by marking of each and every piece before removing it. 3. Followed by centering the nails into the nailing slots by leaving 1/16 inch to 1/8 inch and thus keeping the vinyl to expand and contact Removing the siding - In order to remove the siding you must have zip tool. The most amazing thing of vinyl is that you can remove any piece from anywhere on the wall. To remove the siding it will be better to look for loose spot or at end. Never try to slide the bar behind the nail heads which may lead to breaking. Install the siding – For installing the siding you should mark for siding under the window and allow extra ¼ inch gap on every side of window for expansion. Put the one end of piece into the trim and then bow the siding and the opposite end and do the same for other. After installing the last piece then cut it and put joint above the window. To complete the row put a long length of extra siding. Thus by following these steps you can easily gets the right idea about the procedure of installing vinyl siding. So what’s there to hire other and increase you expenditure just go through this and install vinyl siding in your home by yourself.
|
 RSS Feed